跳过内容
跳过内容 

What Does Window Flashing Mean?
Window flashing, also called flash, is an essential weatherproofing mechanism installed around the window frame’s perimeter to protect the integrity of your building. Window flashing is basically a type of water-resistant barrier.
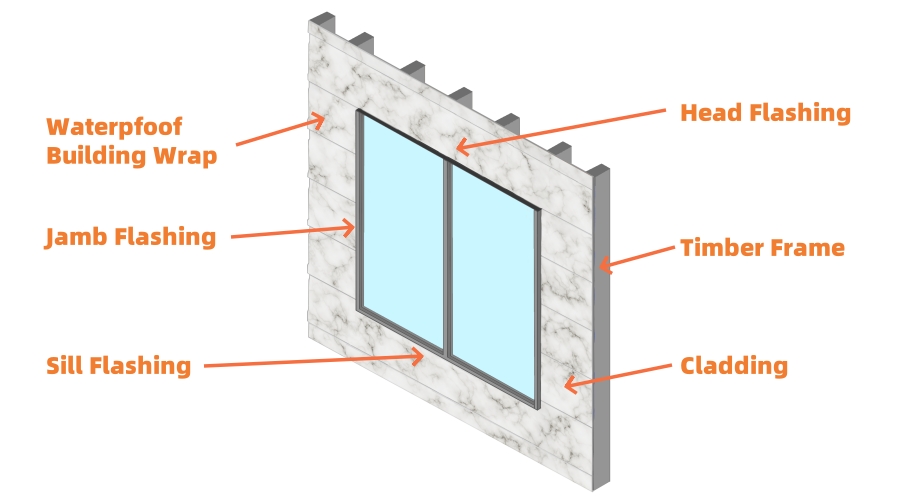
It is usually a thin, flexible, and waterproof material that is designed to prevent wind or water infiltration where the window meets the exterior wall of a house. Window installers or homeowners rely on different types of flashing, including head, jamb, and sill flashing, to make a window waterproof from top to bottom.
Key Importance of Window Flashing
Here are some of the reasons why window flashing is a wise decision for your home:
Prevention of Water Damage
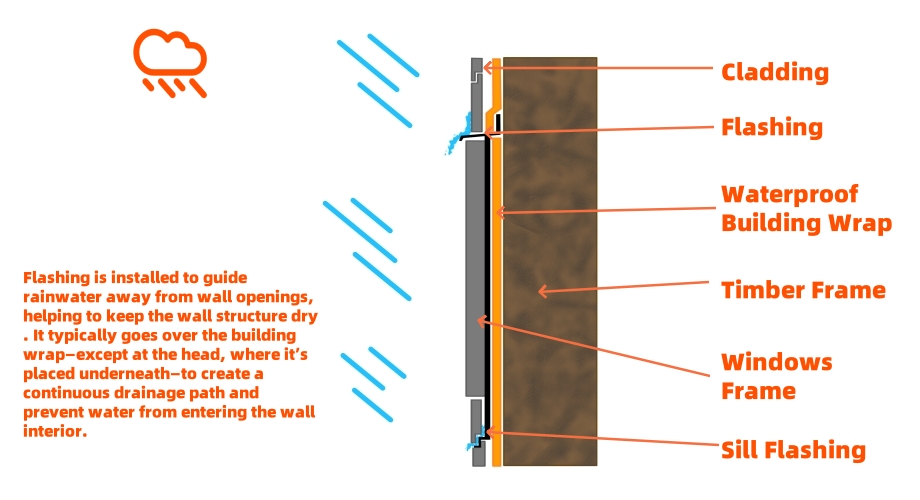
Window flash is an affordable element in your window that helps to protect your investment in several ways. Builders often install window flashing over waterproof housewrap to shed water down and past the wall sheathing.
It also reduces the chances of rainwater seeping into your home’s internal building fabrics. As such, flashing protects your home’s structural integrity and helps to avoid moisture-related structural deterioration that is costly to repair.
Support Thermal Performance
A small feature, such as flashing, has a big impact in maintaining a stable indoor temperature and ensuring comfort at all times. When you properly flash your window trim, it provides long-term solutions such as extending the window’s lifespan and boosting energy efficiency. Consequently, it reduces electricity bills and your dependency on heating and cooling systems.
Regulation Compliance
Window flashing is a standard and highly recommended practice when constructing a new home or need to replace a worn window in the updated National Construction Code and regulations in many regions.
Building inspectors may impose strict taxes for failure to install every residential window without flashing in areas such as Australia. Therefore, you shouldn’t overlook window flashing when fixing your windows, since properly installed flashing prevents water ingress and ensures the extended durability of your finished buildings.
Techniques for Window Flashing Installation
Window flashing installation involves a series of steps to ensure a durable barrier against moisture. Proper installation of window flashing is core to ensuring long-term protection of your window from damage and maintaining your building’s overall integrity. Here is a detailed description of flashing techniques:
Prepare the Rough Opening
Firstly, inspect the window opening to remove any debris or obstacles and ensure it is clean, moisture-free and levelled. Then, apply a water-resistant barrier (WRP) or housewrap or formed metal pans on the exterior wall of the structure and ensure its full and uniform coverage.
Flash the Window Base: Sill Flashing (Sill Pan)
You have to install the first piece of flashing at the base/bottom of the window opening using desired flashing material such as metal flashing or self-adhering flashing tape. Ensure it extends over the rough sill by 6 inches or more on both sides.
Builders often position a sill pan at the window’s bottom line to achieve a continuous seal. You must center the flashing tape across the bottom sill and ensure it slopes outward in a specific order to ensure it prevent rainwater penetrations.
Install the Window
Carefully set the window in the opening and use nails and screw to secure it over the sill pan and wrapping. Ensure to plumb, level, and square the window meticulously during installation to prevent future water pooling.
Flash the Sides: Jamb Flashing
Apply liquid flashing or flashing tape in a vertical direction along both sides of the window over the flanges. Work your way up, ensuring the tape laps the bottom sill flashing and extends a few inches beyond the window’s top.
It helps to ensure a continuous waterproof barrier throughout the corners. Furthermore, apply significant pressure to the flashing tapes to form a firm adhesion and secure bond without air pockets and wrinkles.
Flash the Top: Drip Cap/Head Flashing
Attach the flashing tape across the window top to ensure it extends over the flashing on the sides (jamb flashing) by 1 to 2 inches to create a shingled effect. You can fit a drip cap directly over the flash at the top of the window to keep rainwater away, integrating an extra feature for long-term protection.
Seal and Examine
Keep all leaks or open spaces around the edges of the window frame blocked with a high-quality sealant like caulk to create a secondary protection layer. You should also perform a water test to examine all corners of the installation for potential problems.
Spray water around the window to ensure water doesn’t penetrate the installed barrier system. However, be careful not to overapply the sealant and create a large bead, which can retain water.
Common Window Flashing Materials
Here are various materials for window flashing, along with their benefits and common uses:
- Metal Flashing: Galvanized steel, aluminum, or copper are relatively lightweight and corrosion-resistant construction materials used for window flashing. They provide a durable and strong waterproofing solution for waterproofing windows. Metal flashing is weather-resistant and highly durable, making it ideal for historical buildings where longevity is non-negotiable and homes built in areas that experience heavy rainfall.
- Rubberized Asphalt Flashing: This is a flexible peel and peel-and-stick material that merges rubber and asphalt to provide superior adhesion and excellent waterproofing even in harsh weather conditions. It conforms to irregular structures or shapes and is ideal for new buildings and window restorations.
- Liquid Flashing: This is a liquid-applied sealant often applied as a paintable membrane or sealant to create a reliable waterproof barrier. Liquid flashing is versatile and provides excellent adhesion, making it the standout choice for working on custom window installations and closing irregular openings.
- Self-Adhering Flashing Tape: A flexible, waterproof, and easy-to-install tape with an adhesive backing that adheres to the window and the surrounding structures. It conforms to irregular surfaces and bonds firmly to create a water and airtight seal.
Expert Tips to Properly Flash Your Windows
Here are the best practices for professional window flashing installation :
- Invest in high-quality materials designed to accommodate your window type and specific climate. The flashing tape material must also be compatible with the house wraps and window flanges to ensure a secure and functional seal. Choosing cheaper or incompatible materials can lead to a premature failure of the flashing.
- Combine flashing with other waterproofing mechanisms, including building paper or house wrap, to achieve a continuous weather barrier.
- Install flash in a shingle-like pattern to prevent moisture from bypassing the window flashing. Ensure water flows down and outwards instead of storing behind the layers of flashing installed.
- Use hand pressure or rollers to eliminate air pockets and secure the tapes along the surrounding area of the window. It allows the flashing tapes to adhere tightly against the window frame to provide excellent protection against damage.
- Conduct regular inspections to examine the window flashing and sealant for signs of water damage, peeling, cracks, damp walls, or gaps. You can save more when you identify and fix any deterioration in the installation immediately.
- Although DIY is possible, it is better to let professionals handle the installation. When you let seasoned builders or window installers handle your window flashing installation, it helps ensure a watertight seal and prevents mistakes that can lead to long-term complications.
Conclusion

It is no surprise that windows are among the top vulnerable areas in the building envelope that are prone to water and air leaks. Window flashing protects your home for years to come and you from incurring unnecessary repair costs. Therefore, ensure to invest in the right flashing installation technique and proven material for peace of mind, compliance, and better insulation.
Boswindor is a trustworthy and reliable window installation service provider with end-to-end solutions for your door and window needs. Our experienced team i committed to providing advanced window flashing solutions and a seamless experience in installing and maintaining your windows. Contact us for inquiries and expert guidance on how to elevate your window flashing installation project for optimal results!